How to hide columns from SharePoint forms
Recently, I found myself needing to customize a SharePoint form in such a way that not all columns are displayed when adding a new item to a custom list.
Can you hide certain sections in SharePoint though? The answer is yes, and there are various reasons why you might need to.
In my case, two user groups worked with this list. The first group should be able to create new items to apply for something, and the second user group should review those items and set a status column to ‘approved’ or ‘rejected’. Based on this column, a workflow should start and send an email to the applicant’s manager to inform him or her of the status. This SharePoint list obviously wouldn’t make much sense if the first user group was able to approve their own applications. So I had to find a way to hide the status column when creating a new item.
How to create a hidden column in your SharePoint list
There are many tools available to customize SharePoint forms. But if all you want to do is hide one column and you don’t need any advanced features, it’s easiest to use SharePoint Designer.
Microsoft SharePoint Designer is a freeware HTML editor specialized in creating or modifying Microsoft SharePoint sites, workflows and web pages. You can download SharePoint Designer 2013 here.
To illustrate this blog post, I created a new custom list with two columns, ‘title’ and ‘status’. The status column is a pick list that lets you choose between ‘new’, ‘approved’, and ‘rejected’.

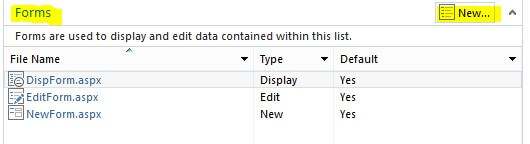
There are three default forms for custom lists:
- NewForm.aspx is the default form used to add new items to a list.
- EditForm.aspx is the default form used to edit existing list items.
- DispForm.aspx is the default form used to view list items
When I open my custom list and click on new item, the NewForm.aspx of this custom list loads. This is the form I want to customize to hide the ‘status’ column.
When I create a new item and then edit it, the EditForm.aspx loads. This form should continue to display the ‘status’ column.


- To customize a SharePoint form, simply start SharePoint Designer and connect to your SharePoint site. More information about how to connect to a SharePoint site can be found here. Once you’re connected, click on Lists and Libraries on the left hand pane and select the custom list you want to customize.

- A page to view and manage the settings for this list opens. On the right-hand side, you can find the three forms mentioned above:
- Click on New… to create a form in SharePoint. Choose name, type and whether or not this new form should be the new default form.
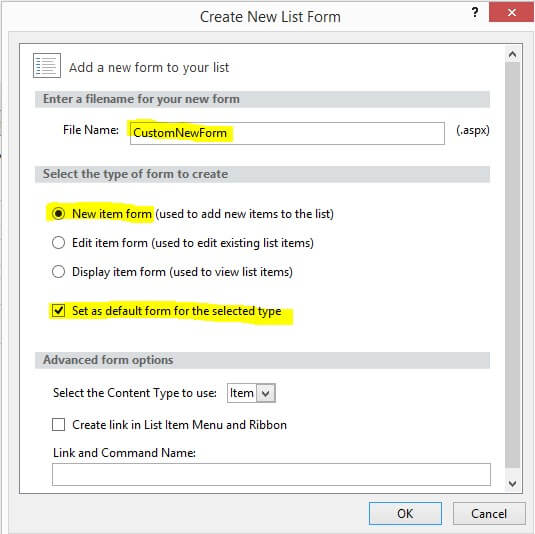
- After clicking OK, the new form is created and displayed in the forms list on the settings page. Right click the new CustomNewForm.aspx to open it in the advanced editor.

- A page opens where you can edit the .aspx code. There is a passage of the code that lists all columns as a table. Each table row represents a column in your list. In my case, that’s the ‘title’ and the ‘status’ row. Scroll down until you find the row that you want to hide:
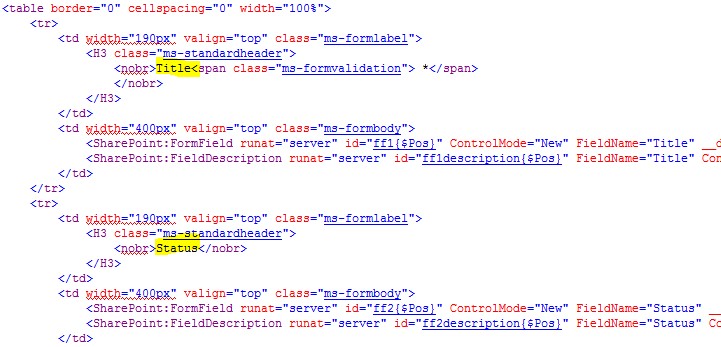
- You can hide the column by adding “style=’display:none’” to the <tr> tag.

- Then save the form and acknowledge the warning. Now if I go back to the SharePoint list and click on new item, the new default form for adding items is displayed, missing the ‘status’ column!

However, if I go ahead and save the item, then open and edit it, the ‘status’ column will still be displayed.


RECENT POST