


How to connect Azure API Management (APIM) to Service Bus securely with managed identity
In integration scenarios with more than one inbound endpoint, it often makes sense to use API Management services (or APIM for short) to manage, revise, and test your APIs, among other things. In the Azure world, this means using the Azure API Management service.
After your APIM instance receives and, if necessary, transforms incoming requests, they are forwarded to components responsible for the actual data processing. This could be a Power Automate flow or an HTTP-triggered Azure Function, for example. But what if you want to use Azure Service Bus for reliable communication between your front and back ends? Or if you’re already using Service Bus but with an intermediary that can become a point of failure, and you’d like to simplify the setup and make it more reliable?
That’s exactly the subject of this article: we’re going to discuss how to set up APIM and Service Bus instances to enable passing requests coming to APIM directly to a Service Bus queue. Spoiler: it’s quite straightforward and will take you less than 15 minutes to implement, provided your user account has the required privileges in Azure. Let’s dive right in!
Step-by-step integration guide
We’re going to use Managed Identities to integrate an Azure APIM service with a Service Bus namespace. We’ll enable a system-assigned managed identity for our APIM service, set up incoming request processing, and assign privileges to this identity for the Service Bus namespace using Azure RBAC role assignment. Let’s unpack these steps one by one.
Setting up APIM
In the Azure portal, navigate to your APIM’s page and then to Security > Managed identities (see the picture below). In the System-assigned tab, enable the system-assigned managed identity using the provided toggle control. We’re using a system-assigned managed identity here since we want it to be bound to our APIM resource. Once you’ve enabled managed identity for your APIM, you should see something like this:

Note that our APIM resource is now registered with Microsoft Entra ID and has a principal ID. We’ll use this in the next step to assign a role to the service principal.
Next, we need to set up incoming request handling. Go to the APIs section (under the APIs submenu) where you have your API operations defined, and select the API operation you’d like to configure. Once the setup is done, you should see something like the following:

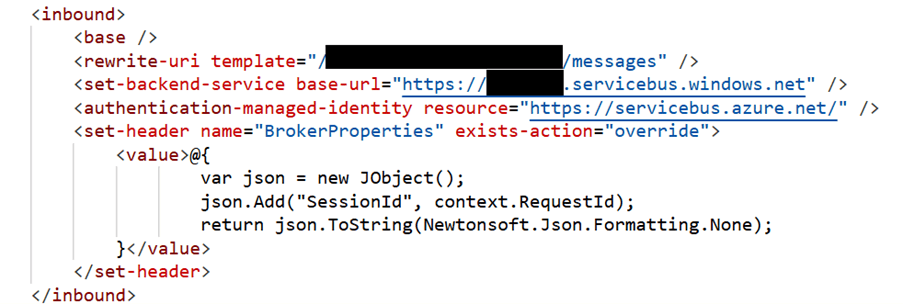
First, let’s talk about inbound request processing. We’re going to forward incoming requests to the corresponding Service Bus queue’s REST API endpoint and use the APIM managed identity for authentication. To achieve this, we’re adding the following policies:
- Set the backend service URL to our Service Bus namespace’s host name ([namespace_name].servicebus.windows.net)
- Rewrite the request path to point to our Service Bus queue (/[queue_name]/messages)
- Authenticate using the managed identity
- Add the SessionId header that Service Bus expects – in our case, it’s just the request’s Id. The other required header, Content-Type, is already present in our incoming request
When the policy setup is complete, you should have something like this in your inbound processing policies code view:
And that’s it! Your requests will now be forwarded to your Service Bus queue’s REST endpoint. The final step is to allow the APIM’s managed principal to send messages to Service Bus queues.
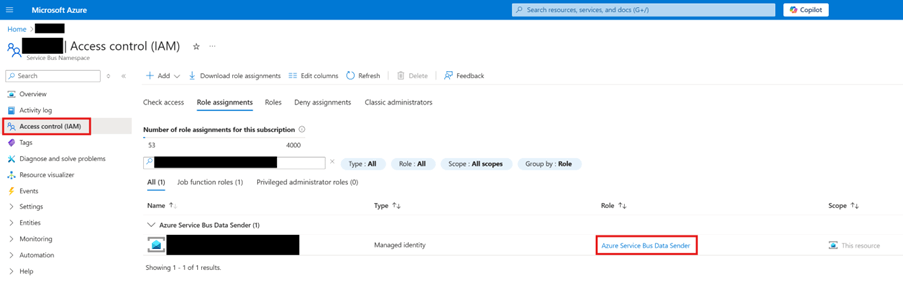
Setting up Service Bus
Navigate to your Service Bus namespace Azure resource and open the Access Control section in the left menu. Since we want our APIM to be able to send messages to Service Bus queues, assign the Azure Service Bus Data Sender role to the APIM service principal. Once this assignment is successful, you should see something like this:
And we’re done! Entra ID will handle authentication, so you don’t have to store any credentials. Now, a request from our APIM instance should land in the Service Bus queue we set up in the previous step.
Testing the integration
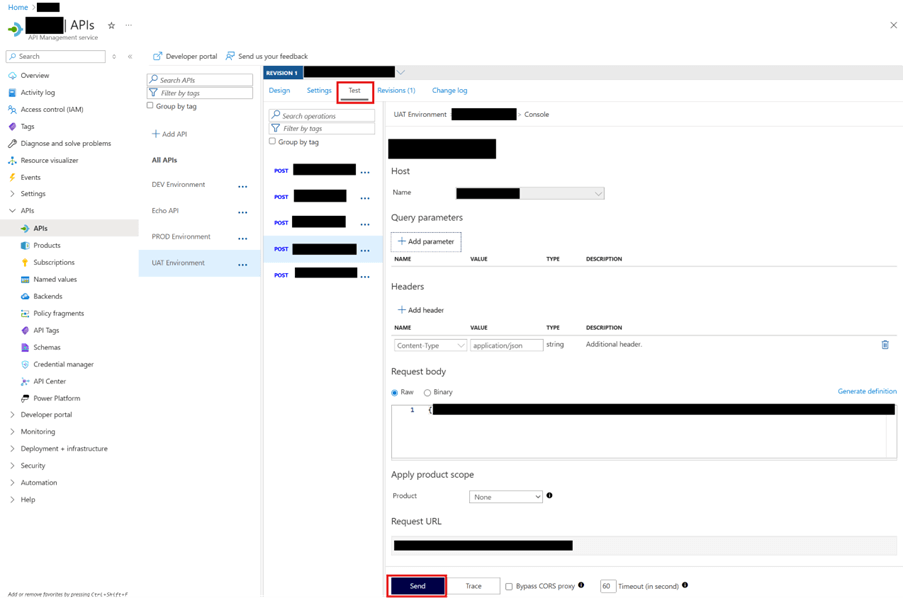
It’s time to make sure our setup is working properly. In your APIM service, go to the API operation you configured for request forwarding to the Service Bus and switch to the Test tab. You can compose your test request here. Once done, click Send, as shown in the picture below:
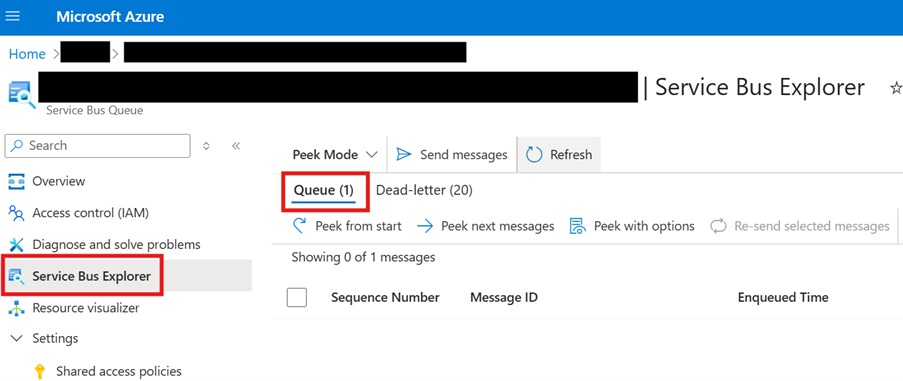
After you receive a successful response, check your Service Bus queue. If everything worked, you should see a new message in the queue:
Summary and next steps
Using Azure APIM in conjunction with Service Bus is easier than it seems. Once you enable a managed identity for your APIM service and assign it the Azure Service Bus Data Sender role for the corresponding Service Bus namespace, you only need to configure a few APIM policies (as described above) for your incoming requests to be accepted into the desired Service Bus queue.
Thanks for reading, and good luck with your Azure projects! Make sure to contact us at proMX for guidance on designing and implementing effective, reliable Azure-based cloud solutions!


RECENT POST
OUR EVENTS

