


From an unmanaged to a managed solution in Microsoft Dynamics 365
Content
There are cases where any customizations were made in the Dynamics 365 default solution in the production environment and therefore it contains unmanaged components/layers. Looking at a scenario like this, you might also find that the production environment is the only environment available which poses challenges in terms of change management and control.
That’s why it is highly recommended to always have separate development, test, and production environments in Dynamics 365. Additionally, it is also recommended to use no more than one publisher across all environments.
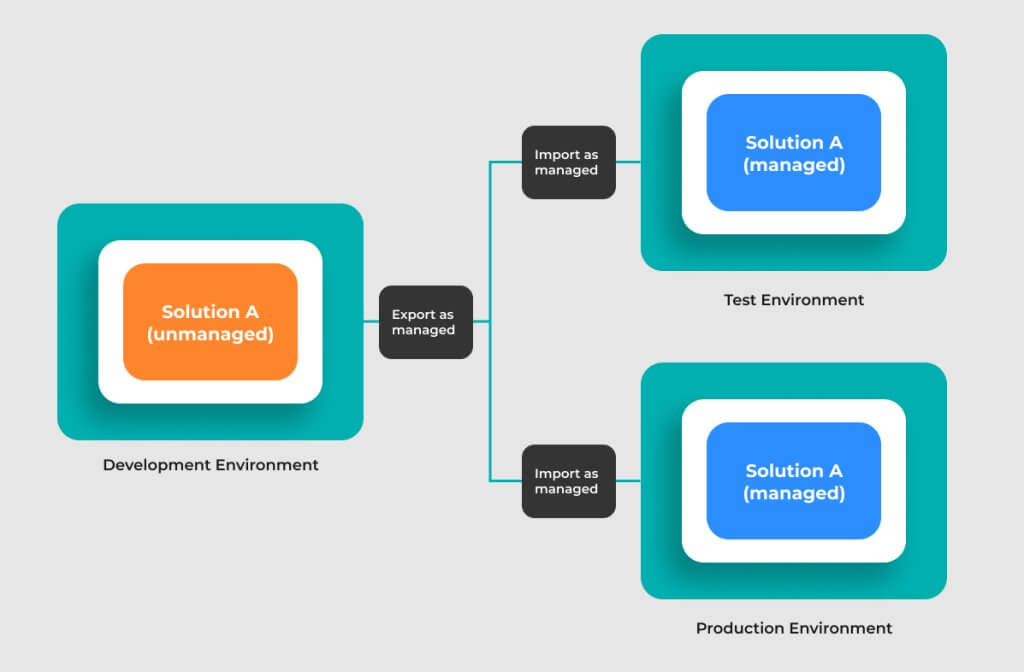
In this article we will describe what needs to be done to go from a production-only environment (with unmanaged components and possibly several publishers) to the best-practice set-up of three separate environments (with one publisher and a managed layer in the production environment).
What is the difference between managed and unmanaged solutions?
Unmanaged solutions are used in development environments for customization / development purposes. You can export unmanaged solutions in the development environment as either unmanaged or managed. When deleting an unmanaged solution, please note that only the solution itself is deleted as it only acts as a container. All the unmanaged customizations in the solution will be kept as they also belong to the default solution.
Managed solutions are used to deploy to any e nvironment, such as the test and production environment, where you preferably should only have managed solutions. For deployment, the unmanaged solution in the development environment should be exported as a managed solution. Other than in unmanaged solutions, you cannot edit components within managed solutions, nor can you export a managed solution. When deleting (uninstalling) a managed solution from an environment, all the customizations included will be removed. This is one of the main differences between unmanaged and managed solutions in Microsoft Dynamics 365.
| Unmanaged Solution | Managed solution | |
| Edit components | Yes | No |
| Export possible | Yes | No |
| Uninstall | Customizations will not be removed | All customizations included will be removed |
So, working with the best-practice scenario, any customizations in Dynamics 365 shall be made in the development environment in an unmanaged solution, and they will be imported to the downstream environments as managed solutions.
How to convert unmanaged solution components into a managed state in Dynamics 365
To convert unmanaged solution components into a managed state, there are a few steps that need to be considered.
All necessary steps will be described, as follows:
- Review unmanaged components in production environment
Check your unmanaged components in the production environment and remove components that are not needed anymore (e.g., old tables with no records). When removing unmanaged components please make sure you consider dependencies. - Set up separate development environment
In case you do not yet have a development environment: You need to make sure that you have a separate production and (at least) development environment. The development environment should be a minimal copy of the production environment. (If you prefer to have a full copy in the development environment, this will of course also be fine).
Please note:- Should you have SharePoint Sites integrated in the production environment, these should be disabled in the development environment after having taken the copy or should be exchanged to link to a SharePoint development environment. Otherwise, you risk writing into production SharePoint from the development environment.
- When making a copy of the production environment, you need to disable the Administration Mode in the newly created environment.
Backup production environment
Create a backup of your production environment in case you need to roll back.
Create a new Publisher
Create a new solution publisher in the development environment. This publisher will be used from now on for any customizations/development.
Create Publisher Solution
Create a new “Publisher Solution” using the newly created Publisher and export this solution as unmanaged.
Create Cover Solution in development environment
In the development environment you will now create a new unmanaged solution. This solution will be the “Cover Solution” which shall contain all custom unmanaged components from the production environment.
Add unmanaged components to Cover Solution
Since there are custom unmanaged components in your production environment and finding all of them might be time consuming, you can use the Tool “FetchXML Builder” (by Jonas Rapp) from the XRM Toolbox to find all required components and their dependencies.
Search custom unmanaged components with “FetchXML Builder”
Open the “FetchXML Builder” in the XRM ToolBox and connect to your development environment (which is a copy of the production environment).
Click on “Options” and “Settings”

Click on “Click here” in the opening window.

A new window opens, and you can now select the publisher that unmanaged components were created with in the production environment.
Please note: Should you have used more than one publisher you should run these steps for each of the publishers.

On the right, you will now see all entities that contain dependencies to a custom component created with the selected publisher.
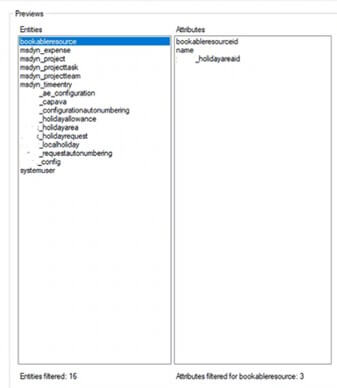
You should now open the “Cover Solution” in the development environment, and you can add all the shown entities and their custom attributes to the solution. You can easily find the custom entities/attributes by looking for the prefix of the selected publisher.
Please note: In case you have been using more than one publisher in the production environment you should run a search for all the used publishers.
If you have canvas apps, flows, portals apps, or PlugIns to convert, you can add them to a separate unmanaged solution now, or later.
- Export Cover Solution as managed
Once all custom unmanaged components are added to the Cover Solution, you can export the Cover Solution as managed. It is recommended to also export the Cover Solution as unmanaged to store it as a backup. - Import Cover Solution to test/production environment
You have now successfully created a Cover solution that can be imported as managed into your production environment (and test environment if available).
If you have a test environment, it is recommended to do the import into this environment first, so you can test everything prior to importing to production environment.
Since currently you can’t just import a managed solution into the same environment that contains the originating unmanaged solution, the import must be made with Power Platform CLI.
Deploy managed Cover Solution using Power Platform CLI
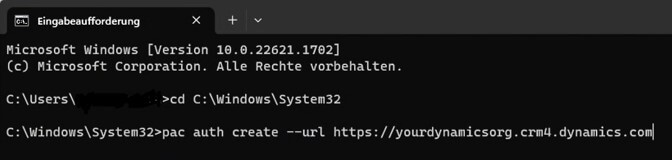
The first step is to open the command prompt (CMD)

Now you must authenticate to the environment you want import the Cover Solution into.
To do this, change to the directory where you have installed the Power Platform CLI:
C:\Users\{username}>cd {Microsoft Power Platform CLI install path}
Now you need to enter the authentication command:
>pac auth create –url {URL to target environment}
After having entered the authentication command, a new window will open for your to enter your Dynamics 365 credentials.
Next, you have to enter the solution import command. For this you need to provide the path to where you have saved the managed export of the Cover Solution.
>pac solution import –path {path to where Cover Solution is saved}

On enter, the command will be processed, and the managed Cover solution will be imported into the selected downstream environment (test environment/productive environment).
3. Cross-Check
After you have made the import of the Cover Solution to the downstream environment(s), you should check that all unmanaged custom components are now shown as managed.
4. Create work solution in development environment
After you have successfully imported the Cover Solution to your downstream environments, you can now set up a new Solution in the development environment to make any customizations/developments in. This new solution should be set up with the newly created publisher. Once any customizations were made and you are ready to transport these to test and production environment, the solution can now be deployed as a managed solution.
Conclusion
Setting up your Dynamics 365 environments as per best-practice is important to guarantee a smoothless deployment process. As you can see above, the possible necessary changes are easy to process, however, should you have any questions or need support, proMX will be happy to help.


RECENT POST
OUR EVENTS

