


Automated data import from Excel to Dynamics 365 using Power Automate and SharePoint
Content
In the dynamic landscape of modern business operations, the efficient and seamless flow of data is paramount for informed decision-making and streamlined processes. One common scenario involves the import of data from Excel spreadsheets into Microsoft Dynamics 365. To address this need, organizations are increasingly turning to Power Automate, a powerful and versatile workflow automation tool, to create automated processes that simplify data imports.
This article delves into the integration of Power Automate and SharePoint to automate the import of data from Excel into Dynamics 365. This approach not only accelerates the data transfer process but also enhances accuracy and reduces the risk of manual errors.
Let’s explore how this integration can revolutionize your data management strategy, bringing efficiency and reliability to your business processes.
The power of Power Automate
Power Automate, part of the Microsoft Power Platform, is a cloud-based service that enables users to create automated workflows between their favorite apps and services. With its user-friendly interface, Power Automate allows users to design automated processes, known as flows, without the need for extensive coding expertise. Flows can be triggered by various events, such as the creation of a new file or the modification of data in a specified application.
Leveraging SharePoint for centralized data storage
SharePoint, another integral component of the Microsoft ecosystem, serves as a centralized platform for document management and collaboration. Its document libraries provide a secure and organized space to store files, making it an ideal repository for Excel spreadsheets containing valuable business data. By integrating SharePoint with Power Automate Flow, organizations can establish a seamless connection between Excel files and their Dynamics environment.
The data import workflow
Our example automated data import workflow involves the following steps:
Excel file trigger: The flow is initiated when a new Excel file is added in a designated SharePoint library.
Data transformation: Power Automate Flow processes the data within the Excel file, transforming it into a format compatible with Dynamics 365.
Dynamics 365 integration: The transformed data is then seamlessly integrated into the Dynamics 365 platform, updating records, or creating new entries as required.
Notification and logging: The flow contains a configuration which creates a log regarding the import step results and sends notifications to a designated email recipient upon completion of the import.
In the subsequent sections, we will delve deeper into the practical steps involved in setting up this automated data import process.
Practical steps to set up Power Automate flow
1. Excel file configuration
To ensure that the flow can “read” the Excel file, you should consider the following for the uploaded file:
- Data must be formatted as a table
- The table must contain headers

2. Create a new automated cloud flow
Step 1 – Create flow and set trigger
You start with creating a new cloud flow. As a trigger, use the SharePoint connector and choose “When a file is created in a folder (deprecated)”.

In our sample we used the trigger “When a file is created in a folder (deprecated)” because only this trigger gave us the option for the file identifier.
Step 2 – Trigger settings
After having set up the trigger, you will have to set the “Site Address” and “Folder ID”. For “Site Address” choose your SharePoint site, and for “Folder ID” choose the actual SharePoint folder the Excel source file will be uploaded to.

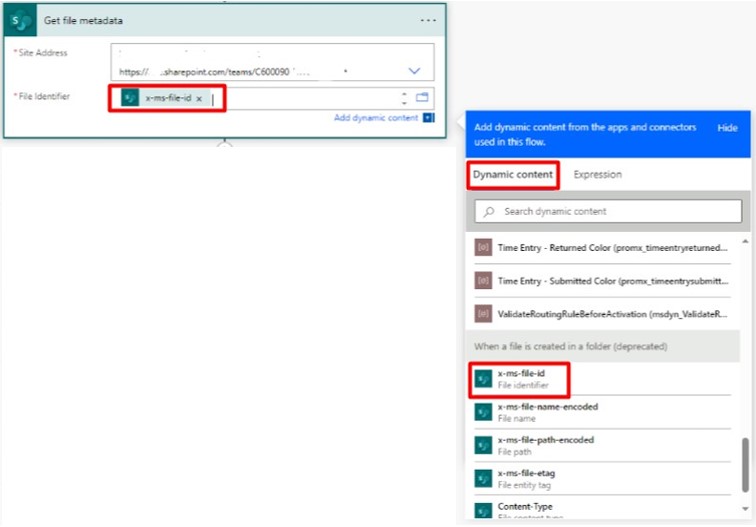
Step 3 – Get file metadata
Once that is done, you now add a step “Get file metadata” from the SharePoint connector. For “Site Address”, select the SharePoint folder the Excel import file is uploaded to from the drop-down list. For “File Identifier”, select the File ID from the previous step.
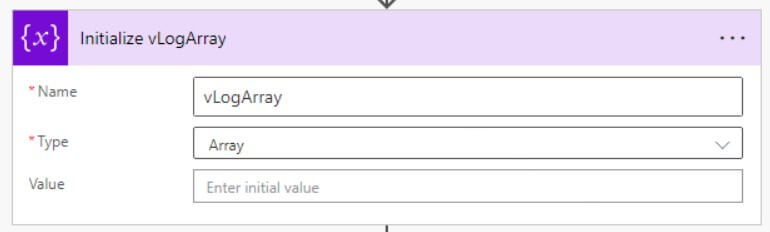
Step 4 – Initialize log array
Now, you should initialize an array variable that will store the log file results.
Step 5 – Get tables
You will now add another step, “Get Tables”, from the Excel connector.
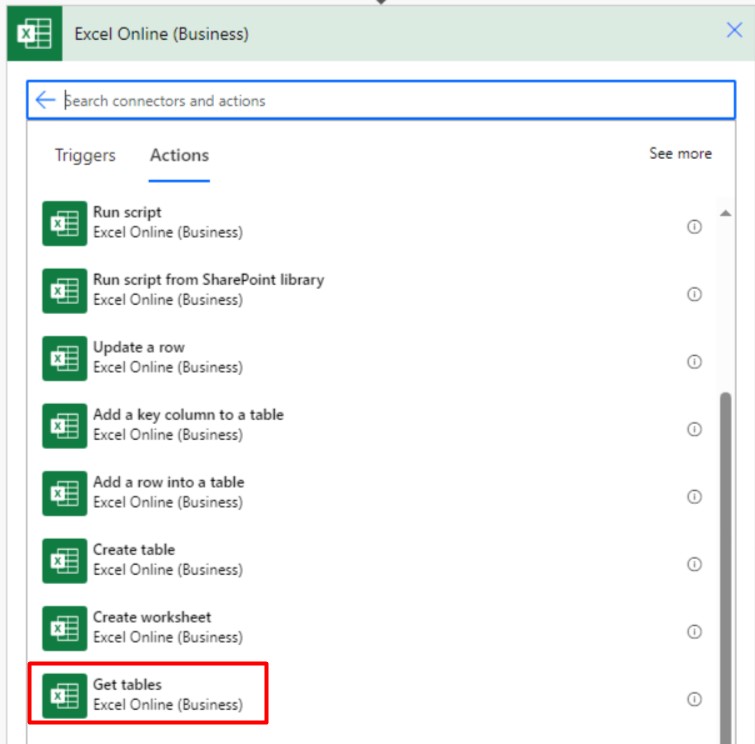
Once the step is added, set your SharePoint site for “Location”; for “Document Library”, select the Document library the Excel File is uploaded to; and for “File”, use the File identifier from “Step 1 – Create flow and set trigger”.

This will load the data table of the excel file into the flow.
Step 6 – Validate Excel file
It is recommended to add a step that validates the formatting of the Excel file as else the data import will fail. To set this up, add an action, “Condition”, which checks if step 5 (“Get tables”) has a valid output. In the condition you can use an expression to check the length of the output.
Sample:
length(outputs(‘Get_tables_within_the_excel_file’)?[‘body/value’])

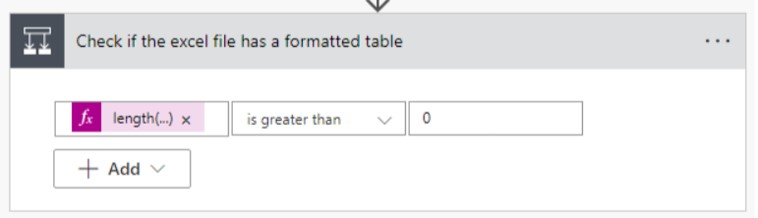
In case there was no valid output, you may also append an error message to your log array.
Step 7 – Apply to each & list rows
You will now add a new control, “Apply to each”, to the flow to loop through the table(s) in the Excel file (which in our case is only one table).
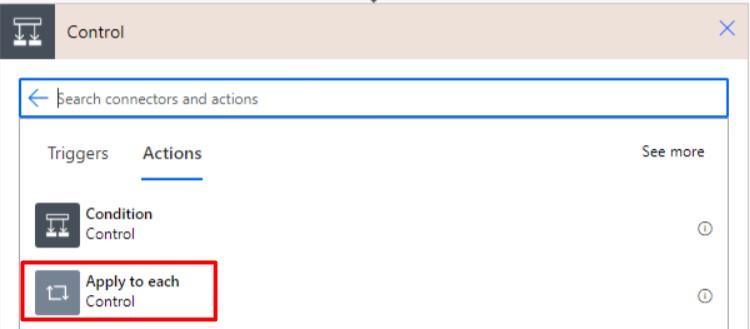
The “Value” will be the output of “Step 5 – Get tables”.
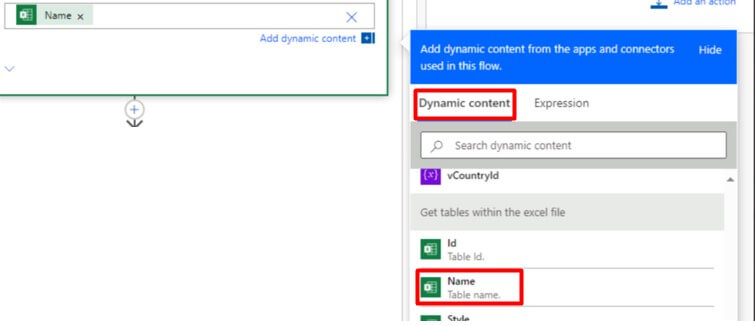
Within this control you will add another step “List rows present in a table”. This step will load the rows of the Excel file into the flow. “Location”, “Document library” and “File” will be the same as in “Step 5 – Get tables”.

In field “Table”, you can select the name from “Step 5 – Get tables”.
HINT: When you are importing Excel files with many rows, you need to make sure that you update a setting of the “List rows present in a table” action. By default, the threshold is set to 256, so this means only 256 will be loaded. We recommend enlarging this, e.g., to 5000, in order to load all the rows of your Excel table.

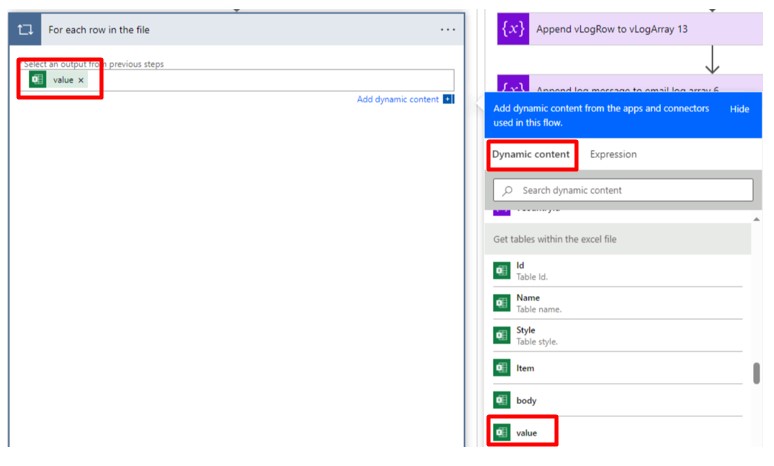
Step 8 – For each row in the file
Add a new step, “Apply to each”, and set “Value” from “Step 5 – Get tables”. You will proceed through each row of the Excel table in this loop.
Within the current step (“Apply to each”), you may want to check if a data record already exists and perform, depending on the result of this check, either an update or an insert action. However, in our example we will only consider the creation of new records.
Step 9 – Add a new row
Add a new step within the loop of “Step 8 – For each row in the file” and choose “Add a new row” from the Dataverse connector.
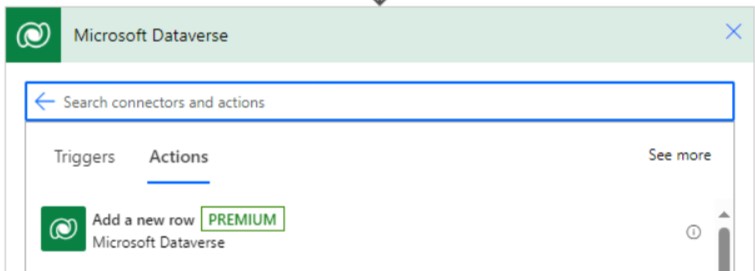
In this example, a new row for the competitor table is used. The name of the competitor will be the value from the Excel table column “Account Name”. This will be repeated for each row of the Excel file.
You can use the output from “Step 8 – For each row in the file” to access the column values of the uploaded Excel file and refer them by the header name.

Step 10 – Join Log array with line breaks (optional)
Create a new step outside the loops to prepare the log array variable, so that the content of it can be written into the log file. Use the Data Operation Connector and choose “Join action”. Join the content of the Log Array variable with a carriage return character. The output of this step will be used in “Step 11 – Create File (optional)” to write the log file.

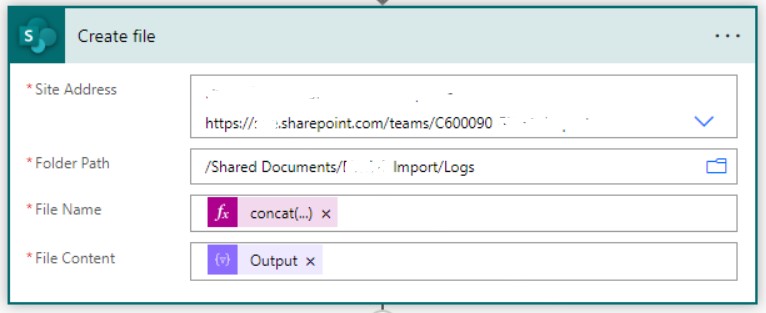
Step 11 – Create file (optional)
Create a new step and choose the “Create file” action from the SharePoint connector.
Add the SharePoint Site and the folder you would like the log file to be stored in.
Create an adequate file name (e.g., something which contains the current date and time to make the file name unique). The file content is the output of “Step 10 – Join Log Array with line breaks (optional)”.
Step 12 – Send email (optional)
If you want dedicated users to be informed upon completion of the import, you can add a “Send an email V2” action from the outlook connector. You should specify the recipient address and a subject.
You can add the output of the log array to the e-mail or add a hyperlink to the log folder or log file you created in “Step 11 – Create File (optional)”.

If you haven’t tried Power Automate but are curious to see how you could use it, request a live webinar from proMX to explore your options together.


RECENT POST
OUR EVENTS

