
How to synchronize Azure Active Directory (AAD) with Dynamics 365 via Microsoft Flow
Content
In one of our Microsoft Dynamics 365 implementation projects for a customer we were faced with the challenge of having to synchronize custom attributes to system users.
By default system users will be synced from Azure Active Directory (AAD) (for which settings are either managed in the Office 365 or Azure portals) or from the on-premises Active Directory (AD) via the AD Connect feature, which is where the set-up to sync custom attributes takes place.
In this default sync, only a static set of attributes is synced with Dynamics 365. Since the sync is a repeating process and our developers were busy with other projects, we developed a sync based on Microsoft Flow, using the AAD connector contained in it.
Preparing for synchronization with the Graph Explorer
In the sample scenario for this post, we are only using Azure AD without an on-premises AD. To retrieve an extension property, we need to first create it. An easy way of doing this is using the Graph Explorer. Here we simply add a sample extension to our AAD.
Once logged in to the Graph Explorer, a single click on show more samples will bring up sample categories area where Extensions can be turned on.
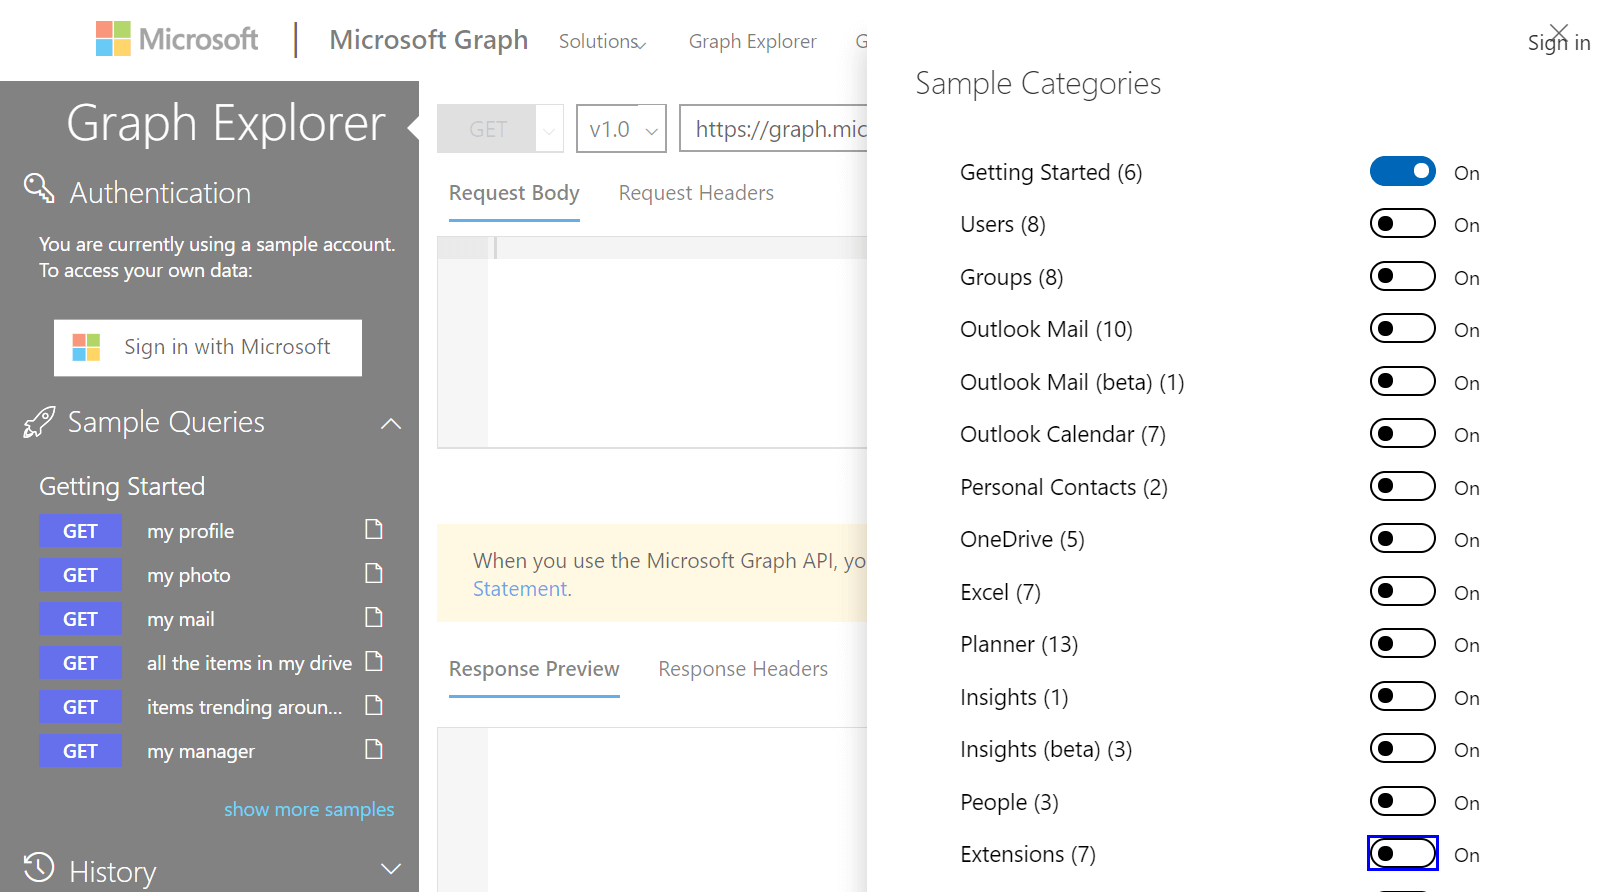
Under the post operations, a sample can be found to create an extension property for the currently logged in user.
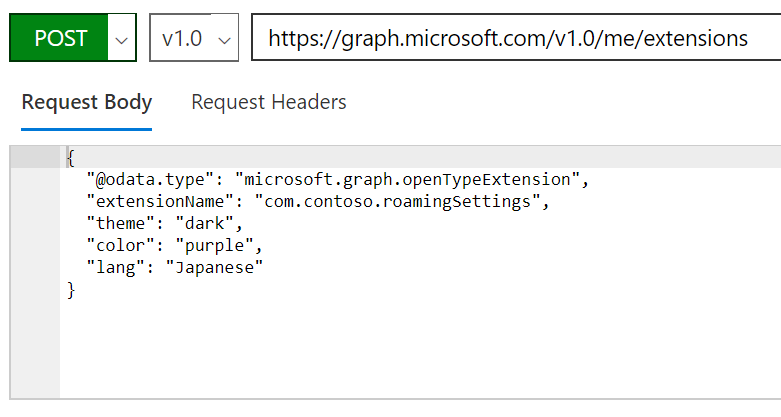
When we run it, an extension property is generated for our user which we can retrieve in order to sync it into Dynamics 365.
Azure Active Directory Flow Connector
We checked the setup of the AAD connector in the documentation but could not find any signs of the use of AAD extension properties. We gave it a try, hoping for some undocumented wonder.
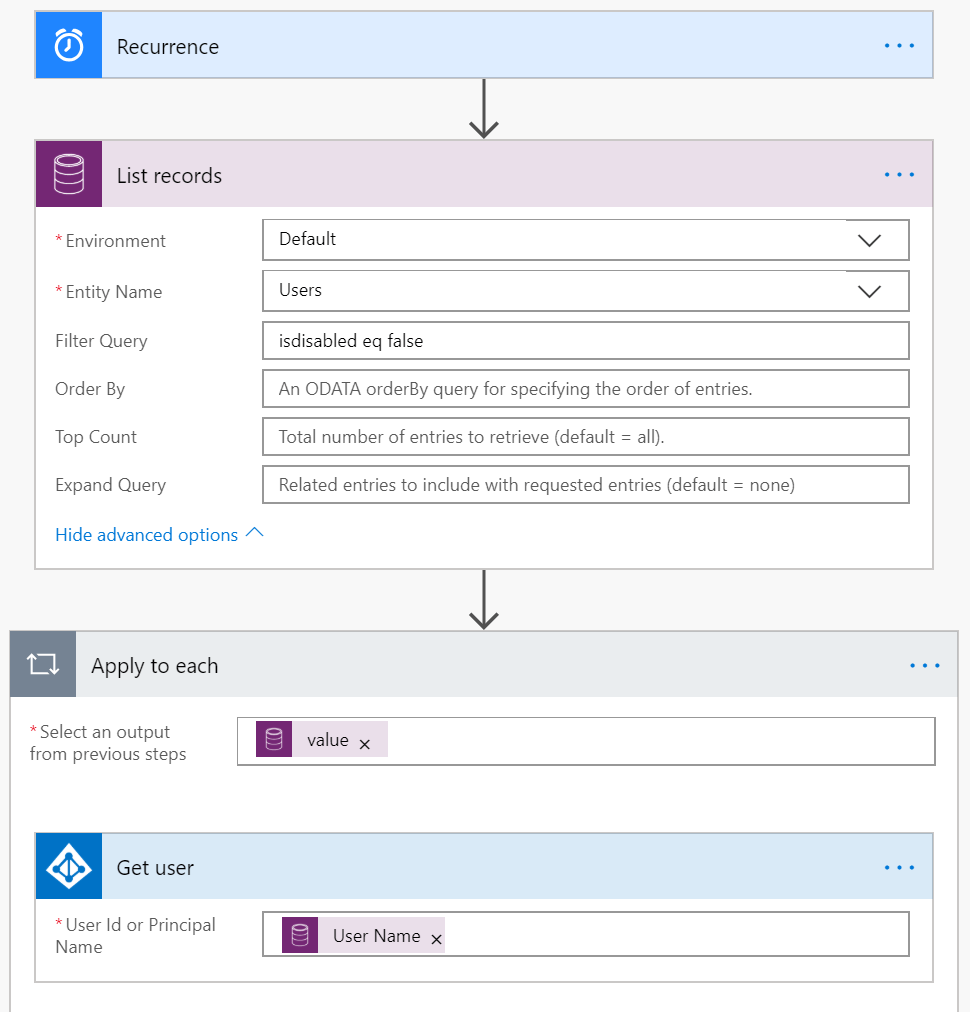
AAD user detail retrieve – Flow
Starting with a recurrence trigger to update our records on a scheduled basis, we load the active system users from Dynamics 365 via CDS to query them against the AAD and retrieve the related user details.
AAD user detail retrieve – results
After we had run our Flow, we checked the results and found them to be annoying. The body we retrieved contained the following details (*** = anonymized):
{
  "@odata.context": "https://graph.microsoft.com/v1.0/$metadata#users/$entity",
  "businessPhones": [
    "***"
  ],
  "displayName": "Daniel Bach",
  "givenName": "Daniel",
  "jobTitle": "Head of R&D",
  "mail": "***",
  "mobilePhone": "+49 1234",
  "officeLocation": "GS",
  "preferredLanguage": "en",
  "surname": "Bach",
  "userPrincipalName": "***",
  "id": "***"
}
As is evident, no extension property exists in this retrieved body element. Instead, we only received the default details which are part of any sync into the Dynamics 365 system.
AAD user detail retrieve – summary
We could successfully retrieve user details from Azure Active Directory but could not get any extension property.
The default AAD connector is useful if you need to sync existing details into new custom attributes in your Microsoft Dynamics 365 organization but it will not provide any additional features.
In some scenarios, it may help to sync phone numbers into the blank Dynamics 365 attributes in order to fill all related fields and to provide details like officeLocation or preferredLanguage.
In our scenario to sync custom attributes this evaluation was not successful. So we decided to look for a better solution.
Due to the response of the graph API, we started to ponder the possibility of directly using the given API and its options.
The following segment illustrates how to use a given API and extend Microsoft Flow when no default connector fits your needs. It’s all about DIY.
How to provide access to AAD using the Graph API
The Graph API provides access to AAD. Applications can use the Graph API to perform create, read, update and delete operations on the directory and its objects. To call on a directory, an application needs to be registered with AAD and access needs to be granted. The authentication is handled via JSON Web Token. The operation we are interested in is the Get a user call.
Later in this section, we will set up the authorization application in Azure and the related Microsoft Flow.
Azure AD Authentication App
To be able to authenticate our Microsoft Flow with the Graph API, we have to add a new application to our AAD.
- To do so, we open the App registrations pane in our Azure management portal.
- We created a new application named “Authentication”. Which URL we use doesn’t matter. Note the Application ID – we will need it later in the Flow.
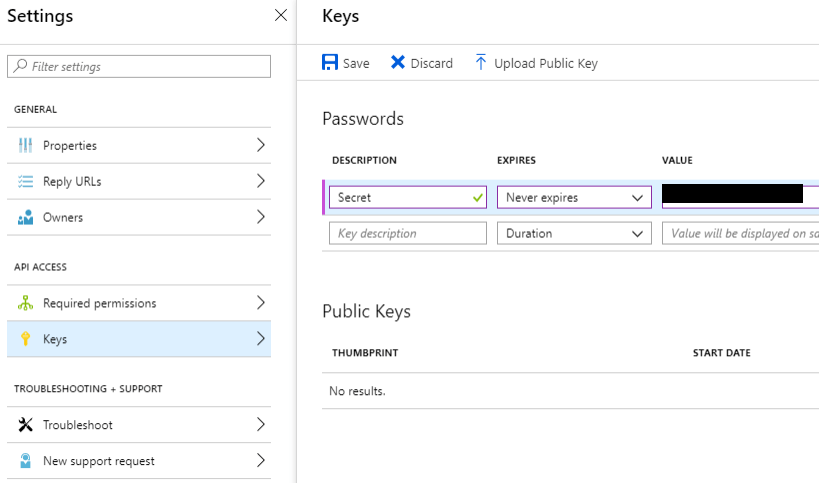
- Under the application settings we need to grant the required access and define our secret. For this we open Settings and go to Required permissions in the API Access section. The Azure AD already exists but we need to add the Microsoft Graph and set up the permissions:

Windows Azure Active Directory
Read directory data
Delegate – Sign in and read user profile
Delegate – Read directory data
Microsoft Graph
Read directory data
Delegate – Sign in and read user profile
Delegate – Read directory data
Once the permissions have been added, we grant them to our application. As a last step, we open Keys in the API Access section to store our Secret. Keep in mind that the secret will be hidden after saving. So, make a copy of it. In our example we set a never expiring secret.
Microsoft Flow
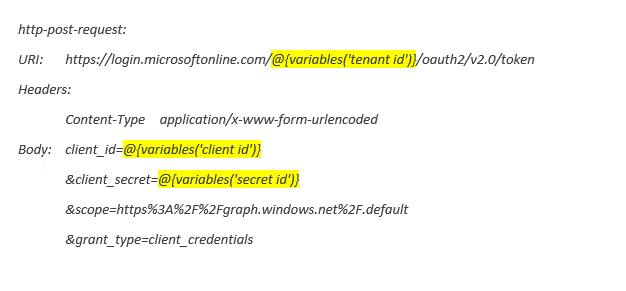
First, we need to authenticate our flow with the previously created app. For this variables are defined containing our tenant id, authentication app id and our little secret.
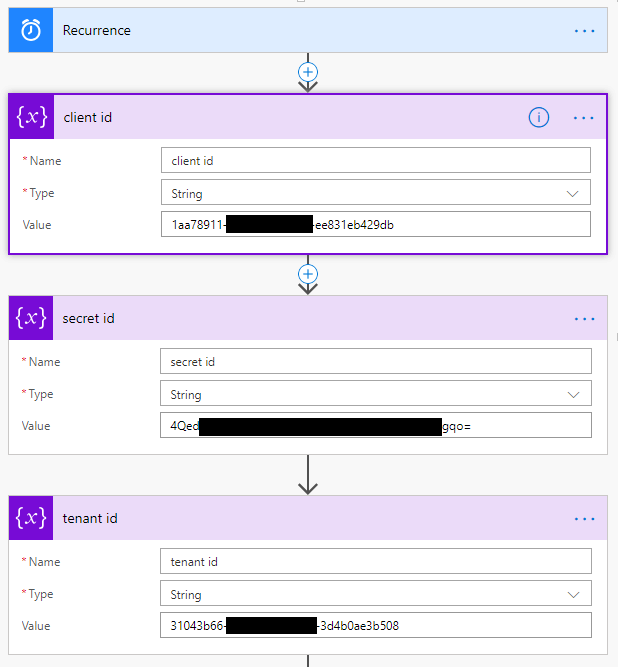
The initial trigger of our Flow is handled by a weekly scheduled recurrence, set to Saturday evening.
Authentication
To get a valid token, we need to generate a Bearer token using the related graph API. In our scenario we were evaluating graph.microsoft.com or graph.windows.net. The related address needs to be defined as the scope in the authorization request. (We used the windows.net API. However, both may work.)
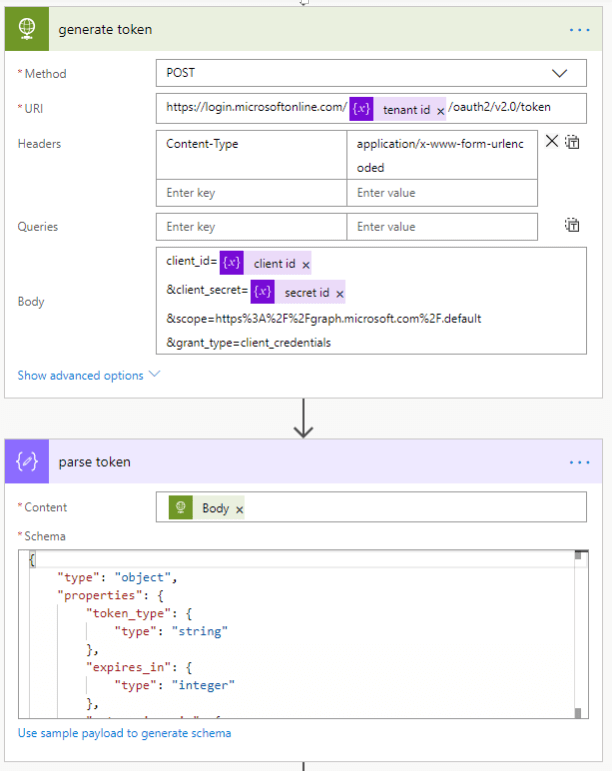
Next, we need to parse the result body from our request using parse-JSON data operation. We use this schema:
{
    "type": "object",
    "properties": {
        "token_type": {
            "type": "string"
        },
        "expires_in": {
            "type": "integer"
        },
        "ext_expires_in": {
            "type": "integer"
        },
        "access_token": {
            "type": "string"
        }
    }
}
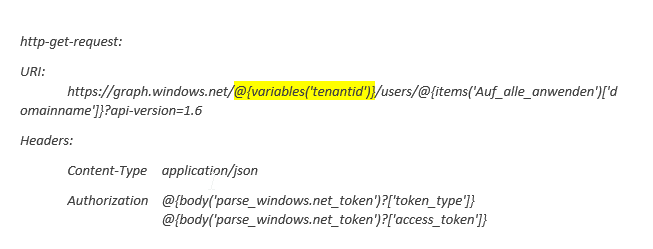
Retrieve User Data
When we have our access token, we can retrieve user data directly using the Graph API. As a very basic trial, we load all active system users from Dynamics 365 and loop through all unique system users.
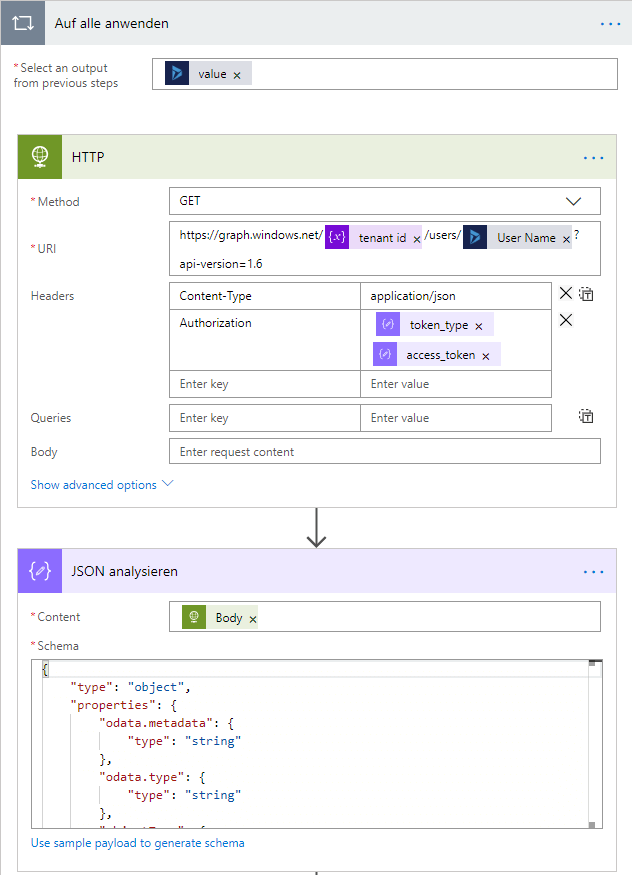
Be careful: In the authorization, there is a blank space added between token type and the access token itself!
Next, we parse the result body from our request using parse-JSON data operation. The used schema can be generated with the detail link.
In a sample output we can see that we get the extension properties starting with extension_*.
Now it is very simple to update the related system user with the different fields coming directly from our AAD.
Graph API user detail retrieve – result
After we had run our flow, we checked the results and they had our properties.
The body we retrieved contained the following details (*** = anonymized) – microsoft.com
{
  "@odata.context": "https://graph.microsoft.com/v1.0/$metadata#users",
  "value": [
    {
      "businessPhones": [
        "***"
      ],
      "displayName": "Daniel Bach",
      "givenName": "Daniel",
      "jobTitle": "Head of R&D",
      "mail": "***",
      "mobilePhone": "+49 1234",
      "officeLocation": "GS",
      "preferredLanguage": "en",
      "surname": "Bach",
      "userPrincipalName": "***",
      "id": "***",
      "extensions@odata.context": "https://graph.microsoft.com/v1.0/$metadata#users('***')/extensions",
      "extensions": [
        {
          "@odata.type": "#microsoft.graph.openTypeExtension",
          "theme": "dark",
          "extensionName": "roamingSettings",
          "id": "roamingSettings"
        }
      ]
    }
  ]
}
As is easy to see, the extension property exists in the retrieved body element.
We get similar results when using windows.net:
{
  "odata.metadata": "https://graph.windows.net/***/$metadata#directoryObjects/@Element",
  "odata.type": "Microsoft.DirectoryServices.User",
  "objectType": "User",
  "objectId": "***",
  "deletionTimestamp": null,
  "accountEnabled": true,
  "ageGroup": "Adult",
  "assignedLicenses": [
    ***
  ],
  "assignedPlans": [
    ***
  ],
  "city": "***",
  "companyName": null,
  "consentProvidedForMinor": null,
  "country": "Germany",
  "createdDateTime": null,
  "creationType": null,
  "department": "IT",
  "dirSyncEnabled": null,
  "displayName": "Daniel Bach",
  "employeeId": null,
  "facsimileTelephoneNumber": "fax",
  "givenName": "Daniel",
  "immutableId": null,
  "isCompromised": null,
  "jobTitle": "Head of R&D",
  "lastDirSyncTime": null,
  "legalAgeGroupClassification": "Adult",
  "mail": "***",
  "mailNickname": "***",
  "mobile": "+49 1234",
  "onPremisesDistinguishedName": null,
  "onPremisesSecurityIdentifier": null,
  "otherMails": [
    "***"
  ],
  "passwordPolicies": null,
  "passwordProfile": null,
  "physicalDeliveryOfficeName": "GS",
  "postalCode": "DE-90409",
  "preferredLanguage": "en",
  "provisionedPlans": [
    ***
  ],
  "provisioningErrors": [],
  "proxyAddresses": [
    "SMTP:***"
  ],
  "refreshTokensValidFromDateTime": "2018-06-26T16:28:49Z",
  "showInAddressList": null,
  "signInNames": [],
  "sipProxyAddress": "***",
  "state": "Bayern",
  "streetAddress": "***",
  "surname": "Bach",
  "telephoneNumber": "***",
  "thumbnailPhoto@odata.mediaEditLink": "directoryObjects/***/Microsoft.DirectoryServices.User/thumbnailPhoto",
  "usageLocation": "US",
  "userIdentities": [],
  "userPrincipalName": "***",
  "userState": null,
  "userStateChangedOn": null,
  "userType": "Member",
  "extension_***_personalTitle": "Master of the universe",
  "extension_***_employeeID": "1337"
}
Graph API user detail retrieve – conclusion
We could successfully retrieve user details from Azure Active Directory and access our extension properties.
This was a very basic setup and we can sync our attributes on a regular basis for the system users. When using Microsoft Flow, it is easy to maintain and extend synched attributes and to update the related system user fields.
FAQ
Azure Active Directory (Azure AD) is a cloud-based identity and access management service provided by Microsoft. It serves as a centralized system for managing and securing user identities, providing authentication and authorization for a wide range of cloud-based applications and services.
If you need to force synchronization between your on-premises Active Directory (AD) and Azure Active Directory (Azure AD), you can follow these steps:
1. On your Azure AD Connect server, open the Azure AD Connect configuration wizard.
2. Select the “Customize synchronization options” option and click Next.
3. On the “Connect to your AD Forest” screen, enter the credentials of a domain administrator account and click Next.
4. On the “Optional features” screen, select the “Synchronize now” option and click Next.
5. Review the synchronization settings and click “Configure” to start the synchronization process.
This will force an immediate synchronization between your on-premises AD and Azure AD. Keep in mind that depending on the size of your directory, this process may take some time to complete.