


Office 365: Easily collaborate in Microsoft Word using Track Changes
Content
If you’re the kind of person who opens Microsoft Word in Office 365 and immediately starts typing away, you’re missing out on some really useful stuff. There’s a lot functionality hidden from view, deep in the depths of the program, such as the “Track Changes” feature, which is a boon if you are collaborating with others on a text.
Here’s a primer for you.
What is “Track Changes” and when should I use it?
“Track Changes“ enables one or more persons to make changes to somebody else’s copy. The twist is: the original author sees who changed what where and can either accept or reject these changes (on a case by case basis or in one fell swoop) as well as reply to the reviewer’s comments.
The feature is particularly useful when asking somebody to proofread you text, suggest different phrasing and to make comments. If all you want your colleague to do is check for typos and spelling errors, using “Track Changes” would be like using a sledgehammer to crack a nut, since each change must be accepted by the author.
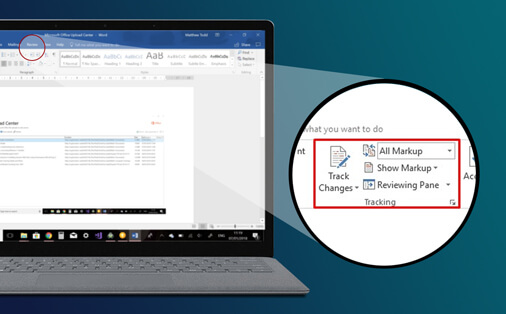
How do I activate it in Microsoft Word?

Navigate to the Review tab and click the Track Changes button in the Tracking area. Once the feature is activated, the button will be highlighted.

All changes (insertions, deletions, format changes) made to your text will be marked with another font color, also recording which person made it.
To stop tracking, click the button once more.
To speed things up, you may also use the shortcut Ctrl + Shift + E.
Which view should I choose?
If the mode is activated, you can choose between four different views of your document:

- Original: As the name suggests, you will see the original text. No matter how many changes have been made to it, you will only see the original copy – as error-riddled or perfect as it may be.

- All Markup: Use this view to see exactly how your text has changed. The original text is in black, all changes made by the reviewer are red and underlined. You can see what specifically was deleted, formatted or added in the so-called Markup Area to the right of the text.

- No Markup: Are you confused by the tohubohu in the previous view? Is it bringing back bad memories from your essay writing days in high school? Then change to this one to see your text in its current state – but without any notes about changes made.

- Simple Markup: This view is only slightly different from Markup: none. Here, you will see red lines in the left-hand margins where changes have been made as well as comments on the right. If your curious, click on the lines which will change the view to Markup: all.


I am reviewing. How do I leave a comment?
With Tracking activated, you can edit the copy as you like it. Select your preferred view and delete what you think should be left out, add letters, words or entire paragraphs that you consider missing, and format to taste. The process doesn’t differ at all from “regular” work in Word. And since none of your changes are finite until the author has accepted them, you don’t have to worry about changing something irrevocably that he or she might not agree with.
If you would like to comment on a passage of the text, select it, right-click to open the context menu and select New comment. (Alternatively, you may also click the eponymous button in the Comments area in the Review tab).
Changed your mind? You can retract your changes, of course. Simply delete what you have added with the Delete or Backspace key. To undo deletions or format changes, navigate to the Markup area on the right and right-click the relevant edit, select Reject Deletion or Reject Format Change respectively.
To delete a comment, right-click on it in the Markup area on the right and select Delete Comment.
Once you’re finished editing, save the file and send it back to its author.
I have received an edited text back. How do I accept or reject changes?
If you have complete confidence in the reviewer, you can accept his or her changes in one fell swoop. Click the arrow just blow the Accept button and select Accept All Changes or Accept All Changes and Stop Tracking. (Likewise, you can reject all changes at once by clicking the arrow below the Reject button and selecting Reject All Changes or Reject All Changes and Stop Tracking.)

If you would like to look at each edit individually, click Accept or Reject. When a change has been accepted, it will be added to the original text and the font color changes to black. You can also skip edits with Previous or return to them with Next.
Delete comments from the reviewer by clicking Reject. You may also Reply to comments if there is another stage in the review process, or Resolve them (in this case the comment still exists but fades into the background). To do so, click the relevant comment and select the desired command.
Any advice?
To make sure that you don’t miss an edit, it is advisable to open the Reviewing Pane. There you will find both the number of edits made as well as a chronological list of all edits, complete with the name of the reviewer and the type of edit. Once an edit has been accepted or rejected, Word considers it dealt with and it disappears from the list.
Maybe your colleague, while enthusiastic and full of beans, is not be the most reliable person? Do you suspect that he or she might not remember to turn on Tracking Changes, or that they don’t know the feature? Then it could be a good idea to activate it before sending your file to them for review. You can also play it safe and prevent them from turning it off: First, activate the feature as described above. Then, click on the downward arrow below the button and choose Lock Tracking. You will be asked to choose a password.

Et voilá: bullet-proof!
FAQ
What is the fastest way to track changes in Microsoft Word?
The fastest way to track changes in Microsoft Word is by activating the “Track Changes” feature that is included in any Microsoft Word package by default.
Does Microsoft Word track changes automatically?
No, Microsoft Word does not track changes automatically. If you want to track your changes for yourself or for others, you need to activate the Office 365 function “Track Changes.”


RECENT POST
OUR EVENTS

